Set Up Your Call Settings
<span id="topic-1" style="padding-top:40px;">Access Call Settings</span>
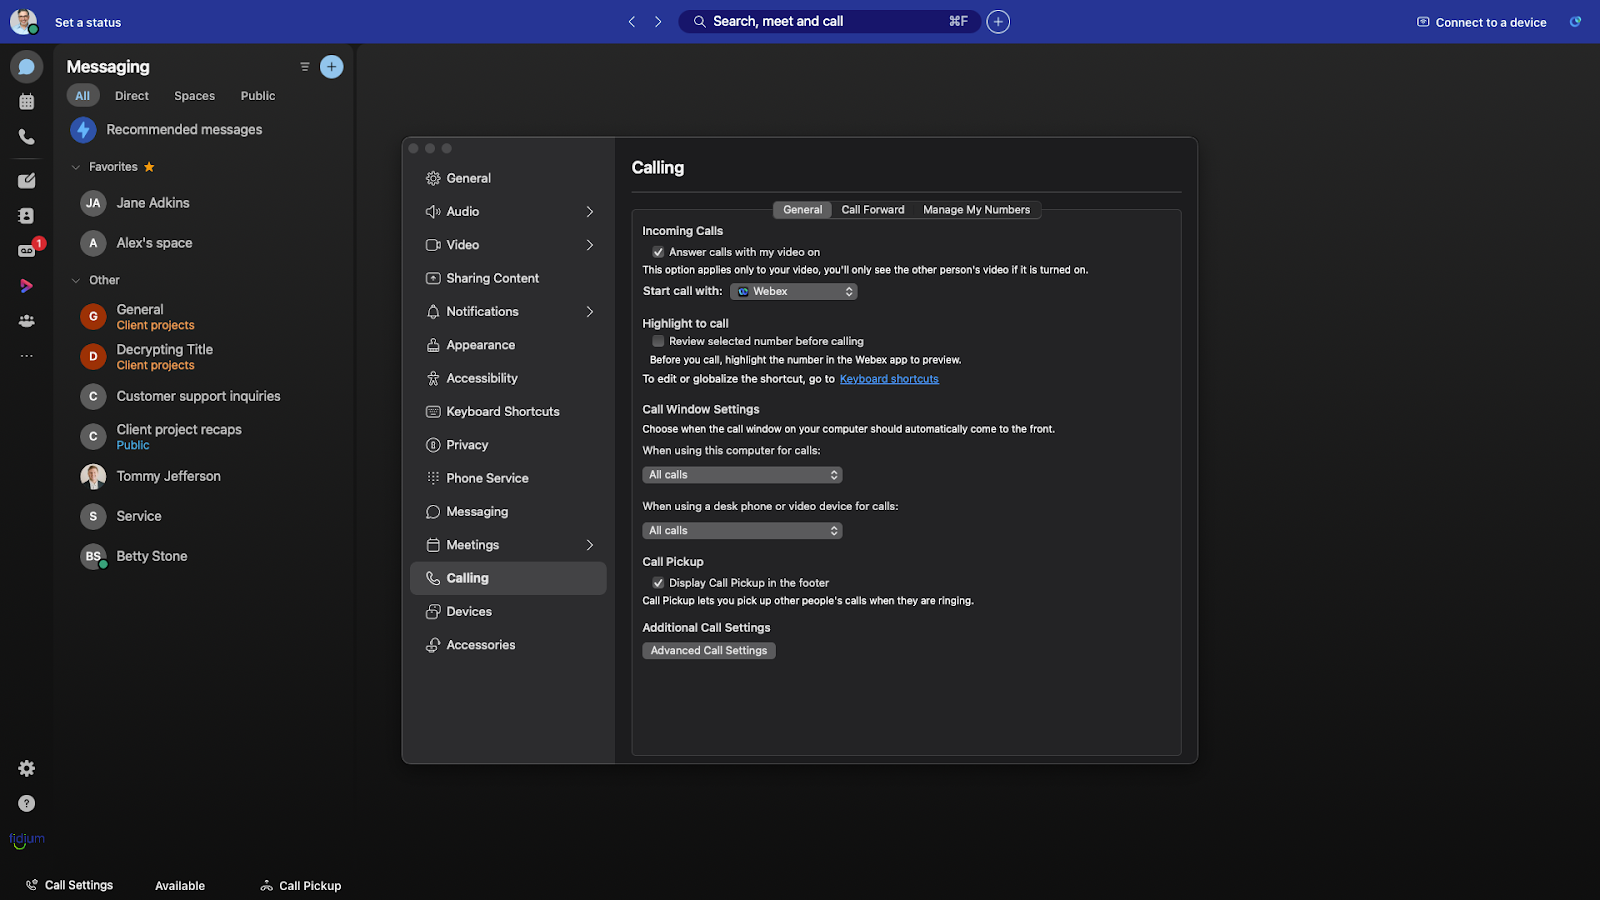
You can access and modify some of the basic call settings within the app.
To access Call Settings:
- 1. Select Call Settings in the lower- left corner.
- 2. Select Open Call Preferences. Click Calling.
- 3. Under Incoming Calls, check the box next to Answer calls with my video on to enable or disable this setting.
- 4. Under Call Forward, you can quickly set up your all forwarding. You can choose one of the following from the drop-down menu:
- Do Not Forward Calls – This is the default. When this is selected, none of your calls are forwarded.
- Voicemail – Choose this option to forward all incoming calls to voicemail.
- Click Add number to add a phone number to forward calls to. Once added, you can then choose to forward calls to that number from the drop-down menu. To remove a phone number from your call forward list, click the Delete icon.
- 5. Click the Manage My Numbers tab to configure your Single Number Reach settings.
- 6. When you have finished making any calling setting changes, click Save to save your changes.
<span id="topic-2" style="padding-top:40px;">Access Advanced Call Settings</span>
Advanced Call Settings allows you to set additional preferences for your phone system.
To access and configure advanced call settings:
- 1. Select Call Settings from the footer.
- 2. Select Open Call Preferences.
- 3. Under Additional Call Settings, click Advanced Call Settings.
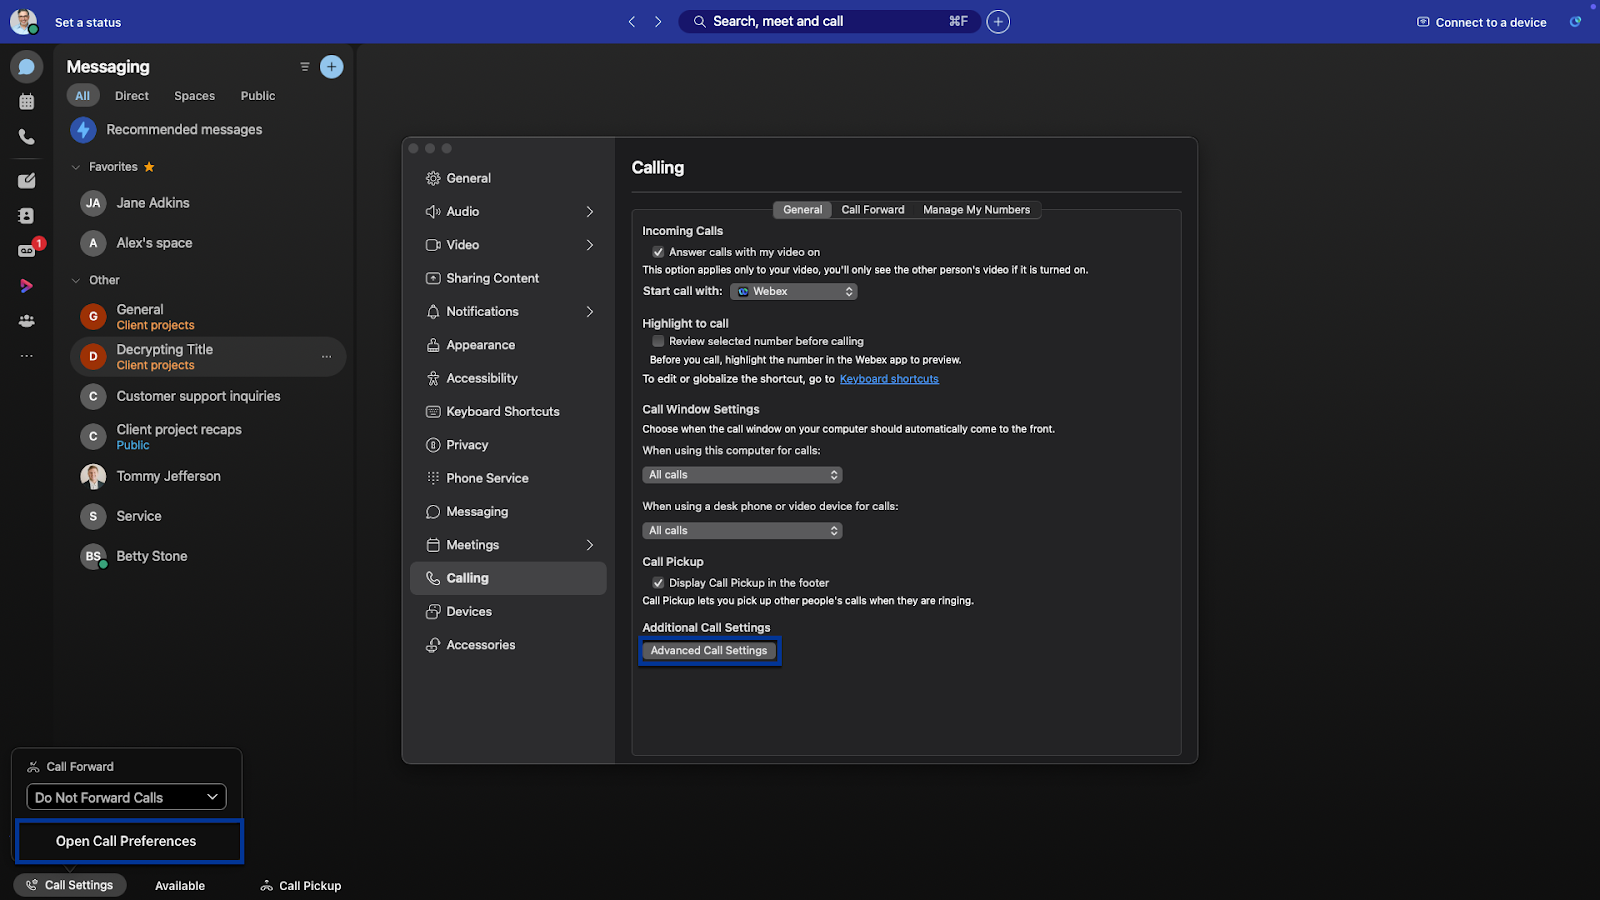
- 4. A window opens where you can modify your incoming and outgoing call settings.
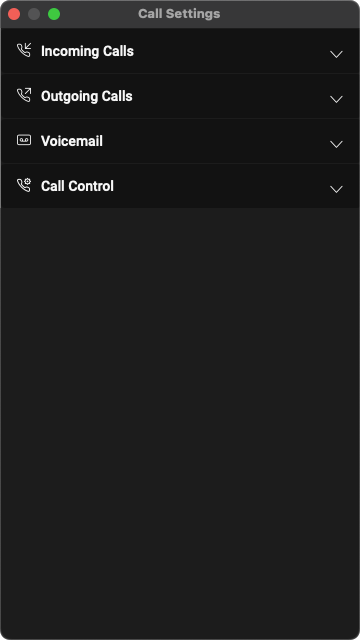
<span id="topic-3" style="padding-top:40px;">Incoming Calls</span>
Incoming call options provide a quick way to set your incoming call preferences, normally configured via the portal, directly from the desktop client. If you are running the softphone app on multiple devices, the settings you manage here will be applied to all of them.
Do Not Disturb
The Do Not Disturb setting will send all incoming calls to voicemail and not ring on your devices. To enable, expand this area by clicking the chevron button. Activate the Do Not Disturb toggle.
Note: Enabling this feature can affect other group call routing features that you may be a part of like a call center or call queue; however, it is recommended that if you are a part of these, that you manage your Do Not Disturb and available status within those environments.
Anonymous Call Rejection
The Anonymous Call Rejection setting provides you with the option to reject calls with a missing caller ID.
Click the toggle to activate this feature.
Call Forwarding
The Call Forwarding feature allows you to forward calls to the desired number instead of your voicemail. Call forwarding options include: always, when busy, when no answer, and when not reachable. If you have not enabled a call forward service here, then calls will automatically forward to voicemail. To start, expand this area by clicking the chevron button.
The Always option forwards all incoming calls to the specified destination and has the highest service precedence. It will override all other forwarding and mobility settings. Check this box to enable and enter the number to forward calls to.
The When Busy option forwards incoming calls only when you have call waiting disabled and are currently on another call or have Do Not Disturb on.
The When No Answer option forwards incoming calls only when you are away or not answering calls. Check this box to enable and enter the number to forward calls. You may also designate the number of rings before being forwarded. Click the drop-down menu to designate the number of rings.
The When Not Reachable option automatically forwards all incoming calls to a different phone number, but only when all of your devices are offline and not connected to the network. To enable, check this box and enter the number to forward calls to.
Sequential Ring
The Sequential Ring option allows you to add phone numbers of other devices that you would like to ring at the same time as your primary phone when you receive a call. You can have up to 10 simultaneous ring numbers at one time. To enable, expand this area by clicking the chevron button. Enter a number in the Set number field and hit Enter. Then, select the slider.
Note: Sequential Ring is a service that is not available to all users.
Call Waiting
The Call waiting feature gives you the ability to handle multiple calls at the same time to make sure no important calls are missed. When the feature toggle is active, you can choose to either accept the incoming call or decline it.
<span id="topic-4" style="padding-top:40px;">Outgoing Calls</span>
Incoming call options provide a quick way to set your incoming call preferences, normally configured via the portal, directly from the desktop client. If you are running the softphone app on multiple devices, the settings you manage here will be applied to all of them.
Do Not Disturb
The Do Not Disturb setting will send all incoming calls to voicemail and not ring on your devices. To enable, expand this area by clicking the chevron button. Activate the Do Not Disturb toggle.
Note: Enabling this feature can affect other group call routing features that you may be a part of like a call center or call queue; however, it is recommended that if you are a part of these, that you manage your Do Not Disturb and available status within those environments.
Anonymous Call Rejection
The Anonymous Call Rejection setting provides you with the option to reject calls with a missing caller ID.
Click the toggle to activate this feature.
Call Forwarding
The Call Forwarding feature allows you to forward calls to the desired number instead of your voicemail. Call forwarding options include: always, when busy, when no answer, and when not reachable. If you have not enabled a call forward service here, then calls will automatically forward to voicemail. To start, expand this area by clicking the chevron button.
The Always option forwards all incoming calls to the specified destination and has the highest service precedence. It will override all other forwarding and mobility settings. Check this box to enable and enter the number to forward calls to.
The When Busy option forwards incoming calls only when you have call waiting disabled and are currently on another call or have Do Not Disturb on.
The When No Answer option forwards incoming calls only when you are away or not answering calls. Check this box to enable and enter the number to forward calls. You may also designate the number of rings before being forwarded. Click the drop-down menu to designate the number of rings.
The When Not Reachable option automatically forwards all incoming calls to a different phone number, but only when all of your devices are offline and not connected to the network. To enable, check this box and enter the number to forward calls to.
Sequential Ring
Sequential ring allows you to create a list of additional numbers to ring in a specific order when you receive an incoming call. To enable, expand this area and then configure the following settings:
- To ring the base location first, select the toggle next to Ring Base Location First.
- Choose your number of rings from the drop-down menu. Select the checkbox next to Continue if busy, if applicable.
- To allow a caller to cancel being sent through to additional phone numbers, select the toggle next to Caller May Cancel.
- Expand Ring Numbers to enter the phone numbers you would like to ring. Enter the phone numbers in the Set number field and press Enter after each one to save.
- For each phone number you can choose to require an answer confirmation by checking the box next to Answer confirmation required.
- For each phone number you can also choose the number of rings before it moves to the next phone number from the drop-down menu.
- Finally, enter the criteria for when this setting is enabled by expanding the When to Ring area.
Call Waiting
The Call waiting feature gives you the ability to handle multiple calls at the same time to make sure no important calls are missed. When the feature toggle is active, you can choose to either accept the incoming call or decline it.
To enable, expand Incoming Calls and select the toggle next to Call Waiting.
Outgoing Calls
In the Outgoing Calls options, you can modify the following features:
Block My Caller ID blocks your phone number when calling other parties or contacts. The Block My Caller ID feature only blocks the Caller ID to external parties. Other people in your company directory will still be able to see the Caller ID. To enable, expand Outgoing Calls and select the toggle next to Block My Caller ID.
Automatic Callback allows you to monitor a busy caller in your group and automatically establish a call to that person when they are no longer busy. For example, if you have been trying to reach someone in your office, but they’ve been on the phone all day, you can either continue to try and call or you can activate Automatic Callback. Once you’ve activated the feature, simply call the party you are trying to reach. If you hear a busy signal, hang up. When the person you're trying to reach is available, you're notified by a distinctive ring on your phone. By answering your phone, your call is established. To enable, expand Outgoing Calls and select the toggle next to Automatic Callback.
<span id="topic-5" style="padding-top:40px;">Voicemail Settings</span>
In the Voicemail options, you can set up several voicemail settings for your business phone number.
- To enable or disable, select the toggle next to Voicemail Service.
- Expand Send Calls to Voicemail to determine your calls go to voicemail.
- Click Set Settings and choose:
- Always
- When busy
- When no answer
- Click OK to save.
- Set the number of rings before you’d like callers to be sent to voicemail from the drop-down.
- Expand When a Message Arrives to choose where you would like to store your voicemail messages.
- If you enable Use unified messaging, voicemail messages are stored on your desk phone and in the user portal. If this is enabled, you can also select whether you’d like to enable the Message waiting indicator on your desk phone.
- Alternately, you can specify an email address where you would like to forward voicemail messages to. These are sent as a .tiff file. To enable this feature, click the toggle next to Forward to email address and enter the email address to send to.
- If you’d like to set up an email notification to be sent when you receive a voicemail, click the toggle next to Email Notification and enter the email address you’d like to send it to.
- If you’d like an audio file sent to an email address, click the toggle next to Email Carbon Copy and enter the email address you’d like to send it to.
- If you’d like to allow callers to transfer from your voicemail greeting, click the toggle next to Press ‘0’ to transfer and enter the number to transfer calls to. If this feature is enabled, be sure to record your voicemail greeting with the appropriate guidance for the caller. For example, “To reach my assistant, press 0.”
<span id="topic-6" style="padding-top:40px;">Call Control</span>
Under Call Control, you can view Call Center Queues statuses and configure Call Center IDs. Additionally, you can set your Office Anywhere settings to alert all locations or ring numbers.